Bring together email, chat, SMS, and social DMs in one shared inbox. No more switching tools, Missive helps your team stay organized and responsive across every customer touchpoint.
Smart assignment & team collaboration
Assign conversations to individuals or teams using round-robin, least-busy, or manual rules. Collaborate internally with comments, tag teammates, and resolve complex issues, without replying all or forwarding threads.
AI automation that works for you
Set up rule-based workflows to auto-route incoming messages, prioritize “urgent” issues, and use integrations to automatically file bugs or update your CRM. Your team focuses on customers, not repetitive tasks.
Context-rich internal discussions
Have real-time chats inside email threads. Ask questions, leave investigation notes, or tag in a specialist, all without leaving the conversation.
Unified inbox for all channels
Bring together email, chat, SMS, and social DMs in one shared inbox. No more switching tools, Missive helps your team stay organized and responsive across every customer touchpoint.
Smart assignment & team collaboration
Assign conversations to individuals or teams using round-robin, least-busy, or manual rules. Collaborate internally with comments, tag teammates, and resolve complex issues, without replying all or forwarding threads.
AI automation that works for you
Set up rule-based workflows to auto-route incoming messages, prioritize “urgent” issues, and use integrations to automatically file bugs or update your CRM. Your team focuses on customers, not repetitive tasks.
Context-rich internal discussions
Have real-time chats inside email threads. Ask questions, leave investigation notes, or tag in a specialist, all without leaving the conversation.
“We wanted support to feel like a real interaction with a human who cares about what's happening to you and has expertise in the product. Very often support interactions are missing one or both of those elements.”
Triage as a team. Assign with clarity. Keep every issue moving.
Internal chat on email threads
Collaborate in-line. No Slack detours. No confusion.
Custom automations
Use keywords or rules to file bugs, tag issues, or alert engineers.
Aliases for a personal touch
Let replies come from real people, not “Support Bot #92.”
Merge threads for clarity
Combine multiple messages from the same user into one cohesive view.
A better alternative to traditional helpdesks
Helpdesk Tools
Missive
Personal replies
Ticket-based, robotic
Feels like real email
Internal collaboration
Basic notes
Chat, tagging, & assignments
Multi-device support
Limited mobile apps
Same power, on every device
Integrations
Limited or clunky
Custom triggers & automations
What support teams are saying
4.8
→ Over 1000 reviews
Great piece of collaborative customer service solution, that's easy to use and understand. Collaborative features and ease of connecting the communication channels. We've been using it for 3 years now and it has always been a solid solution for our customer service team. It enables all channels to be mixed together in a familiar email-type interface.
I run a customer service agency handling over 700 tickets a day, and we manage everything inside Missive like it’s nothing. I connected 16 inboxes, added a few users, and everything was set up in minutes.But what blows my mind the most is the performance. I’ve never seen an app this blazing fast. It’s honestly life-changing — I feel like I have superpowers.
Think of it as an ACD system for distributing incoming client emails, chats and sms. You can automate these assignments so they distribute to your available agents automatically or you can have the agents work them from the centralized team box. Team Leads/Supervisors can create rules to help manage SLAs and anyone with access to the team mailbox is able to access any email regardless of assignee. (...)
Seven ready-to-use auto-reply email templates for out-of-office, support, job applications, and more, plus setup steps for Missive, Gmail, and Outlook.
An auto-reply email is a pre-written message your email client sends automatically when someone emails you, usually to let them know you’re out of office, to confirm receipt of a support request, or to acknowledge a business inquiry. Below are seven proven templates for the most common situations, plus the steps to set them up in Missive, Gmail, and Outlook.
Emails take up more than a quarter of the average workweek, so it makes sense that people dread coming back from vacation to a full inbox. A good auto-reply sets expectations for the sender, tells them who to contact in the meantime, and buys you a little breathing room when you’re back.
This guide covers what an auto-reply is, seven ready-to-use templates for different situations, and step-by-step setup instructions for Missive, Gmail, and Outlook.
What is an automatic email reply?
An automatic email reply (sometimes called an out-of-office reply, autoresponder, or canned response) is a message your email client sends on your behalf when an incoming message meets certain conditions. Common triggers:
Time-based: dates you’re away on vacation, leave, or at a conference.
Sender-based: emails from specific addresses, like a job applications inbox.
Content-based: emails with certain subject lines or keywords, often used for support ticket confirmations.
Most email clients support auto-replies natively. Missive, Gmail, and Outlook all handle the basics, though each has different strengths, which you’ll see in the setup sections below.
7 auto-reply email examples for every situation
Each of these templates uses Missive’s variable syntax to auto-fill the recipient’s name and other details. If you’re not using Missive, just replace the curly-brace variables with plain text.
1. Out-of-office auto-reply (general template)
Whether you’re on vacation, a local holiday, or taking time off for family reasons, this template works for any out-of-office situation. The {{ user.status }} variable pulls in your current Missive status automatically, so one template covers every occasion.
Hi {{ recipient.first_name | default: 'there' }},
I’ll be out of the office for {{ user.status | default: 'personal reasons' }} from the 19th to the 26th. I won’t be responding to emails during that time.
If you need help before I’m back, please contact Jane (jane@mycompany.com).
Kind regards, [Your signature]
2. Out-of-office auto-reply for maternity or paternity leave
A longer leave needs a longer-horizon reply. Give a clear date range, point to a reliable backup contact, and set expectations about whether you’ll check email at all during the leave.
Hi {{ recipient.first_name | default: 'there' }},
I’m on {{ user.status | default: 'parental leave' }} from November 19th until March 19th and won’t be checking email during that time.
For anything time-sensitive, please contact Jane (jane@mycompany.com); she’s covering my work while I’m away.
Best regards, [Your signature]
3. Auto-reply for someone no longer with the company
When someone leaves, their inbox doesn’t stop receiving emails. A well-written auto-reply redirects the sender to the right person and keeps the door open for future business.
Hi {{ recipient.first_name | default: 'there' }},
I’m no longer with the company and this email address isn’t being monitored.
Anything I was previously working on can now be directed to Jane (jane@mycompany.com). Thanks for the partnership over the years.
Best regards, [Former employee]
4. Out-of-office reply with an alternative contact method
If your email isn’t the best way to reach you for urgent matters, this template gives senders a backup channel (phone, text, or a teammate) without inviting every non-urgent sender to call.
Hi {{ recipient.first_name | default: 'there' }},
Thanks for your email. I’m currently out of office for {{ user.status | default: 'personal reasons' }} and checking email sparingly.
For anything urgent, you can text me at 555-555-5555; please identify yourself so I know who’s reaching out. For everything else, I’ll reply when I’m back.
Best, [Your signature]
5. New support request auto-reply
Customer support is the most common use case for auto-replies. An instant “we got your message” acknowledgment goes a long way toward reducing anxiety and cutting down on duplicate follow-ups from the same person.
Hi {{ recipient.first_name | default: 'there' }},
Thanks for reaching out. We’ve received your message and someone from the team will get back to you within 24 business hours.
In the meantime, you might find what you’re looking for in our help center: [help-center-url]
Best, The Support Team
6. General business inquiry auto-reply
For info@ or contact@ inboxes, a quick auto-reply confirms the message landed and sets a response expectation. This prevents the sender from assuming their email got lost and emailing three more times.
Hi {{ recipient.first_name | default: 'there' }},
Thanks for reaching out. We’ve received your message and will get back to you within 1-2 business days.
If your inquiry is about a specific product or service, mentioning it in the subject line helps us route you to the right person faster.
All the best, [Your team]
7. Job application auto-reply
Candidates often apply to dozens of roles at once and have no idea whether their application was received. A simple acknowledgment with a realistic timeline respects their time and reflects well on your company.
Hi {{ recipient.first_name | default: 'there' }},
Thanks for applying. We’ve received your application and will review it within the next two weeks. If you’re moving to the next stage, we’ll be in touch directly.
We appreciate the interest.
Best, [Hiring team]
How to write a professional auto-reply
The seven templates above cover most situations. When you’re writing your own, keep these principles in mind.
Keep it short. The sender should know three things within a few seconds: (1) why you’re not replying right now, (2) how long they should expect to wait, and (3) who to contact if it’s urgent. Anything beyond that is fluff.
Stay professional. You don’t need to explain why you’re away or where you’re going. “Out of office” is enough. Avoid detailed stories about the vacation you’re on or the medical situation you’re dealing with.
Warn the person you’re redirecting to. Before naming a coworker as the backup contact, make sure they know they’re the backup contact. Surprise coverage duties breed resentment.
Be explicit about the alternative. If you’re saying “for urgent matters, contact X,” be clear about what counts as urgent. Otherwise every sender will decide their issue qualifies.
Proofread. An auto-reply sends to hundreds of people while you’re not looking. A typo in your out-of-office reply is visible to everyone you correspond with for two weeks straight.
Include a signature. Even for an auto-reply, your normal email signature tells the recipient how to verify they’ve reached the right person.
A few common mistakes worth avoiding:
Forgetting to turn it off. Nothing undermines “I’m back from vacation and ready to work” like an auto-reply still saying you’re away until next Monday.
Inviting “urgent” contact when you don’t want to be disturbed. If you offer an escape hatch, expect it to be used. If you genuinely don’t want interruptions, say so.
Trying to be funny. A joke that lands in person rarely lands in text, and it definitely doesn’t land the two-hundredth time a stranger receives your auto-reply.
How to set up auto-replies in Missive
In Missive, auto-replies are built with rules and canned responses. The combination gives you far more control than a simple out-of-office toggle.
Create the response. Go to Settings > Responses and write your template using variables for personalization.
Create a rule. Go to Settings > Rules > Create rule, pick Email as the channel and Incoming message as the trigger.
Add conditions. Filter which incoming emails trigger the auto-reply (all emails, specific senders, emails to a specific account, emails containing certain keywords, etc.).
Add the action. Choose “Send response” and select the template you just created.
Optional: throttle. Set “Send at most once every X per conversation” so the same sender doesn’t get the auto-reply 10 times on the same thread.
Save.
For personal out-of-office replies, Missive also has a dedicated personal auto-response feature tied to your status. Set your status to “Out of office,” define the date range, and Missive handles the rest.
How to set up auto-replies in Gmail
Gmail’s vacation responder is the simplest option for a basic out-of-office reply.
In Gmail, click the gear icon > See all settings.
Scroll to Vacation responder at the bottom of the General tab.
Turn it on, set the start and end dates, and write your subject and message.
Optionally, limit the reply to people in your Contacts or to your organization only.
Click Save Changes.
For more targeted auto-replies (specific senders, specific keywords), you’ll need to combine Gmail templates with filters:
Enable Templates in Settings > Advanced > Templates.
Compose your message, then click the three dots > Templates > Save draft as template.
Create a filter (in the search bar, click Show search options) with your criteria, then select Send template as the filter action.
How to set up auto-replies in Outlook
Outlook splits between the new and classic versions; the steps are slightly different.
New Outlook and Outlook on the web:
Click the Settings gear in the top right, then go to Accounts > Automatic replies.
Toggle Turn on automatic replies.
Set a time range if you only want the reply to run during specific dates.
Write your reply. You can set a different message for people outside your organization.
Click Save.
Classic Outlook for Windows:
Go to File > Automatic Replies.
Select Send automatic replies.
Check Only send during this time range and set the dates if applicable.
Write your reply in both the Inside My Organization and Outside My Organization tabs as needed.
At a minimum: why you’re not responding (out of office, out of hours, reviewing a support ticket), how long the sender should expect to wait, and who to contact in the meantime if the issue is urgent. Three sentences is usually enough. Long auto-replies signal that you have too much to say about your absence; short ones signal you’ve got it handled.
How long should an out-of-office message be?
Two to four sentences. Any longer and the sender stops reading. Any shorter and you haven’t set expectations. The seven templates above are all in this range and can be used as a length benchmark.
Can I set up an auto-reply for specific senders only?
Yes, in every major email client. In Missive, add a condition to your rule filtering by sender address or domain. In Gmail, combine a filter with a template. In Outlook, use rules (File > Manage Rules & Alerts > New Rule) rather than the simple Automatic Replies toggle, which applies to everyone.
What’s the difference between an auto-reply and a canned response?
An auto-reply sends automatically based on rules you’ve set up, without any human action. A canned response is a saved template you insert manually into an email you’re about to send. The two overlap, most auto-replies are built from canned responses, but the key difference is whether a human is in the loop when it sends.
How do I set up an auto-reply for a shared inbox?
This depends on the client. In Missive, shared inboxes (like support@ or sales@) can have rules that send auto-replies on behalf of the team, so responses don’t get sent from a specific individual. In Gmail and Outlook, shared mailboxes usually need the auto-reply configured by an admin at the mailbox level, not the individual level; personal out-of-office replies don’t apply to shared addresses.
What should I write in an away message for Outlook?
Any of the templates in this guide will work. Outlook lets you set one message for people inside your organization and a different (usually more formal) message for people outside. The “out-of-office general template” and the “alternative contact method” template are the two most common picks for Outlook away messages.
Can auto-replies hurt customer relationships?
They can, if they’re poorly written. The most common complaints: auto-replies that don’t say when the person will be back, auto-replies that promise a follow-up that never comes, and auto-replies with no alternate contact for urgent situations. Done well, they set expectations and reduce anxiety. Done badly, they feel like being put on hold.
Should I include a link to my FAQ or help center?
For support auto-replies, yes. A linked help center deflects common questions and often resolves the sender’s issue before anyone on the team has to reply. For personal out-of-office replies, usually no; it adds clutter without helping.
Five underused Missive features that quietly save the most time: merging threads, a custom sidebar, inline canned responses, the command bar, and custom thread names.
Five Missive features that quietly save the most time once you actually use them: merging email threads, customizing your sidebar, inserting canned responses inline with #shortname, the command bar (Cmd/Ctrl+K), and renaming threads so they make sense at a glance. Most people know Missive has these. Fewer people build them into their daily workflow.
When I started my career, my first experience with team email was chaotic. Multiple inboxes, scattered conversations, constant back-and-forth about who was handling what. It was a nightmare.
At my last job, we used Missive, and it was night and day compared to my previous experience. But it wasn’t until I discovered some of the hidden features that things really clicked for me.
Over the past few years I’ve used Missive daily, and for the last year I’ve been helping Missive customers uncover the hidden gems. Today I want to share the five features that transformed how I handle communication. These aren’t the flashy ones, they’re the practical, everyday tools that make a real difference.
1. Merging email threads
You know when someone starts a new email thread about something you’re already discussing in another thread? This used to drive me crazy. In Missive, you just drag one conversation onto the other and they merge into a single thread. Everything stays in order, nothing gets lost, and suddenly all your context is in one place.
Merge two conversations into a single one.
Where this shines:
A customer replies to an old email instead of the original thread for the same issue
Multiple customers reporting the same issue
Getting quotes from different suppliers
Project discussions that branch off and need to be reconnected
Pro tip: You can’t undo a merge, but you can move messages out of a merged conversation into new private or shared ones.
2. Your sidebar, your rules
Customizing your sidebar might not sound revolutionary at first, but trust me: it’s like finally organizing your desk after years of chaos.
What makes it special:
Move your most-used mailboxes to the top
Hide the stuff you rarely touch
Group things however they make sense to YOU
Create separate sections for different projects or clients
Customize the sidebar to your liking.
How different teams use this:
Support teams:
Support Team Inbox at the top
Urgent issues section with labels
Team chat of the Support team
Archived mailbox hidden but accessible
Sales teams:
Hot lead labels front and center
Separate sections for each pipeline stage
Quick access to Sales team room
“Follow-up” label pinned
Project managers:
Project-specific inboxes grouped
Client communication sections
Team room easily accessible
Deadline-sensitive items labels
Pro tip: You can also create whole new sections. Just drag an item on top of the +More button in the sidebar.
3. Type # and save hours
This feature is genuinely powerful: inserting canned responses inline. Do you know what I mean?
Type a hashtag followed by your response name, and boom, your full message appears right where you’re typing. No more copying and pasting, no more digging through templates.
#hi: Personalized welcome messages for new email requests
#followup: “Thanks for reaching out”
#lmka: “Let me know if you need anything else, I’d be happy to help”
#meet: Inserts a link with my Calendly availability
#thanks: Thank-you messages with next steps
Power user tips:
Create variations of common responses (formal vs. casual)
Include variables for personalization
Set up team-wide responses for consistency
Use short, memorable hashtags for the ones you use most
Create responses in multiple languages
4. The command bar (Ctrl/Cmd + K)
If you learn one keyboard shortcut in Missive, make it this one. Press Cmd+K on Mac (or Ctrl+K on Windows) and you’ve got instant access to pretty much everything.
One shortcut to rule them all.
Things you can do from the command bar:
Create new emails, events, or tasks
Access settings and preferences
Switch between 1:1 rooms
Search for specific messages
Manage rules and labels
Open contact books
Set a status
And much more
If I time-track myself for a week with and without using the command bar, the difference is about 3 minutes saved each day just from reducing mouse usage and menu navigation. Compound that over a year and it adds up fast.
5. Custom thread names that actually make sense
This last one is simple but brilliant. You can rename email threads to whatever you want.
Instead of: Re: D-001-2 Ext. Non-Variable → You can call it: Partnership with Titan
Include priority levels (“URGENT: Server Issue Resolution”)
Add dates for time-sensitive stuff (“Q4 Planning - Due Oct 30”)
Tag conversations by department (“HR: New Hire Onboarding - Sarah”)
Putting it all together: power user workflows
The real magic happens when you combine some of these features.
Handling an inbound request from big leads:
Pin your “Big Leads” label to the sidebar
Merge all email communication and Calendly invites into one thread
Use the command bar for quick navigation between your other tasks
For support teams, try this workflow:
Merge support requests from the same customer
Rename threads with issue types and status
Use canned responses for common solutions
Organize the sidebar by priority levels
The impact on your daily work
Depending on your use case, after implementing these features across your team:
Email response time drops by a few minutes per day
Context switching goes down
Team coordination improves
Getting started
Don’t try to implement everything at once. Start with the feature that addresses your biggest pain point:
Drowning in split conversations? Start with merging
Spending too much time on repeated responses? Focus on inline canned responses
Can’t find anything? Organize the sidebar
Lost in endless threads? Start renaming conversations
Give them a shot. Start with one, get comfortable, then move on to the next. You might be surprised at how much time you save. For more on how Missive fits into team email workflows, see our guide to shared inboxes.
Use Claude to draft faster, more consistent customer email responses, without sacrificing quality or your brand voice.
The problem with customer email at scale
You know the pattern. A customer emails asking about your return policy, and you write a thoughtful reply. An hour later, someone else asks the same question, and you write it again, slightly differently this time. By the end of the week, four different teammates have answered the same question four different ways, and now your customers are getting inconsistent information.
This is the daily reality for most small and mid-size teams handling inbound email. The questions are predictable, the answers exist somewhere in your head (or scattered across docs and past replies), and yet every response still takes manual effort. You can’t hire fast enough to keep up, and canned responses feel robotic.
Claude, Anthropic’s AI model, is particularly well-suited to this problem. It’s strong at following nuanced instructions, adapting tone, and handling the kind of unstructured, context-heavy communication that customer email requires. Here’s how to set it up in a way that actually works for a team.
Before you prompt anything: figure out what to automate
The biggest mistake teams make with AI email is jumping straight to “write me a reply.” Before you touch a prompt, spend an hour looking at your inbox. You’re looking for the 20% of question types that make up 80% of your inbound volume.
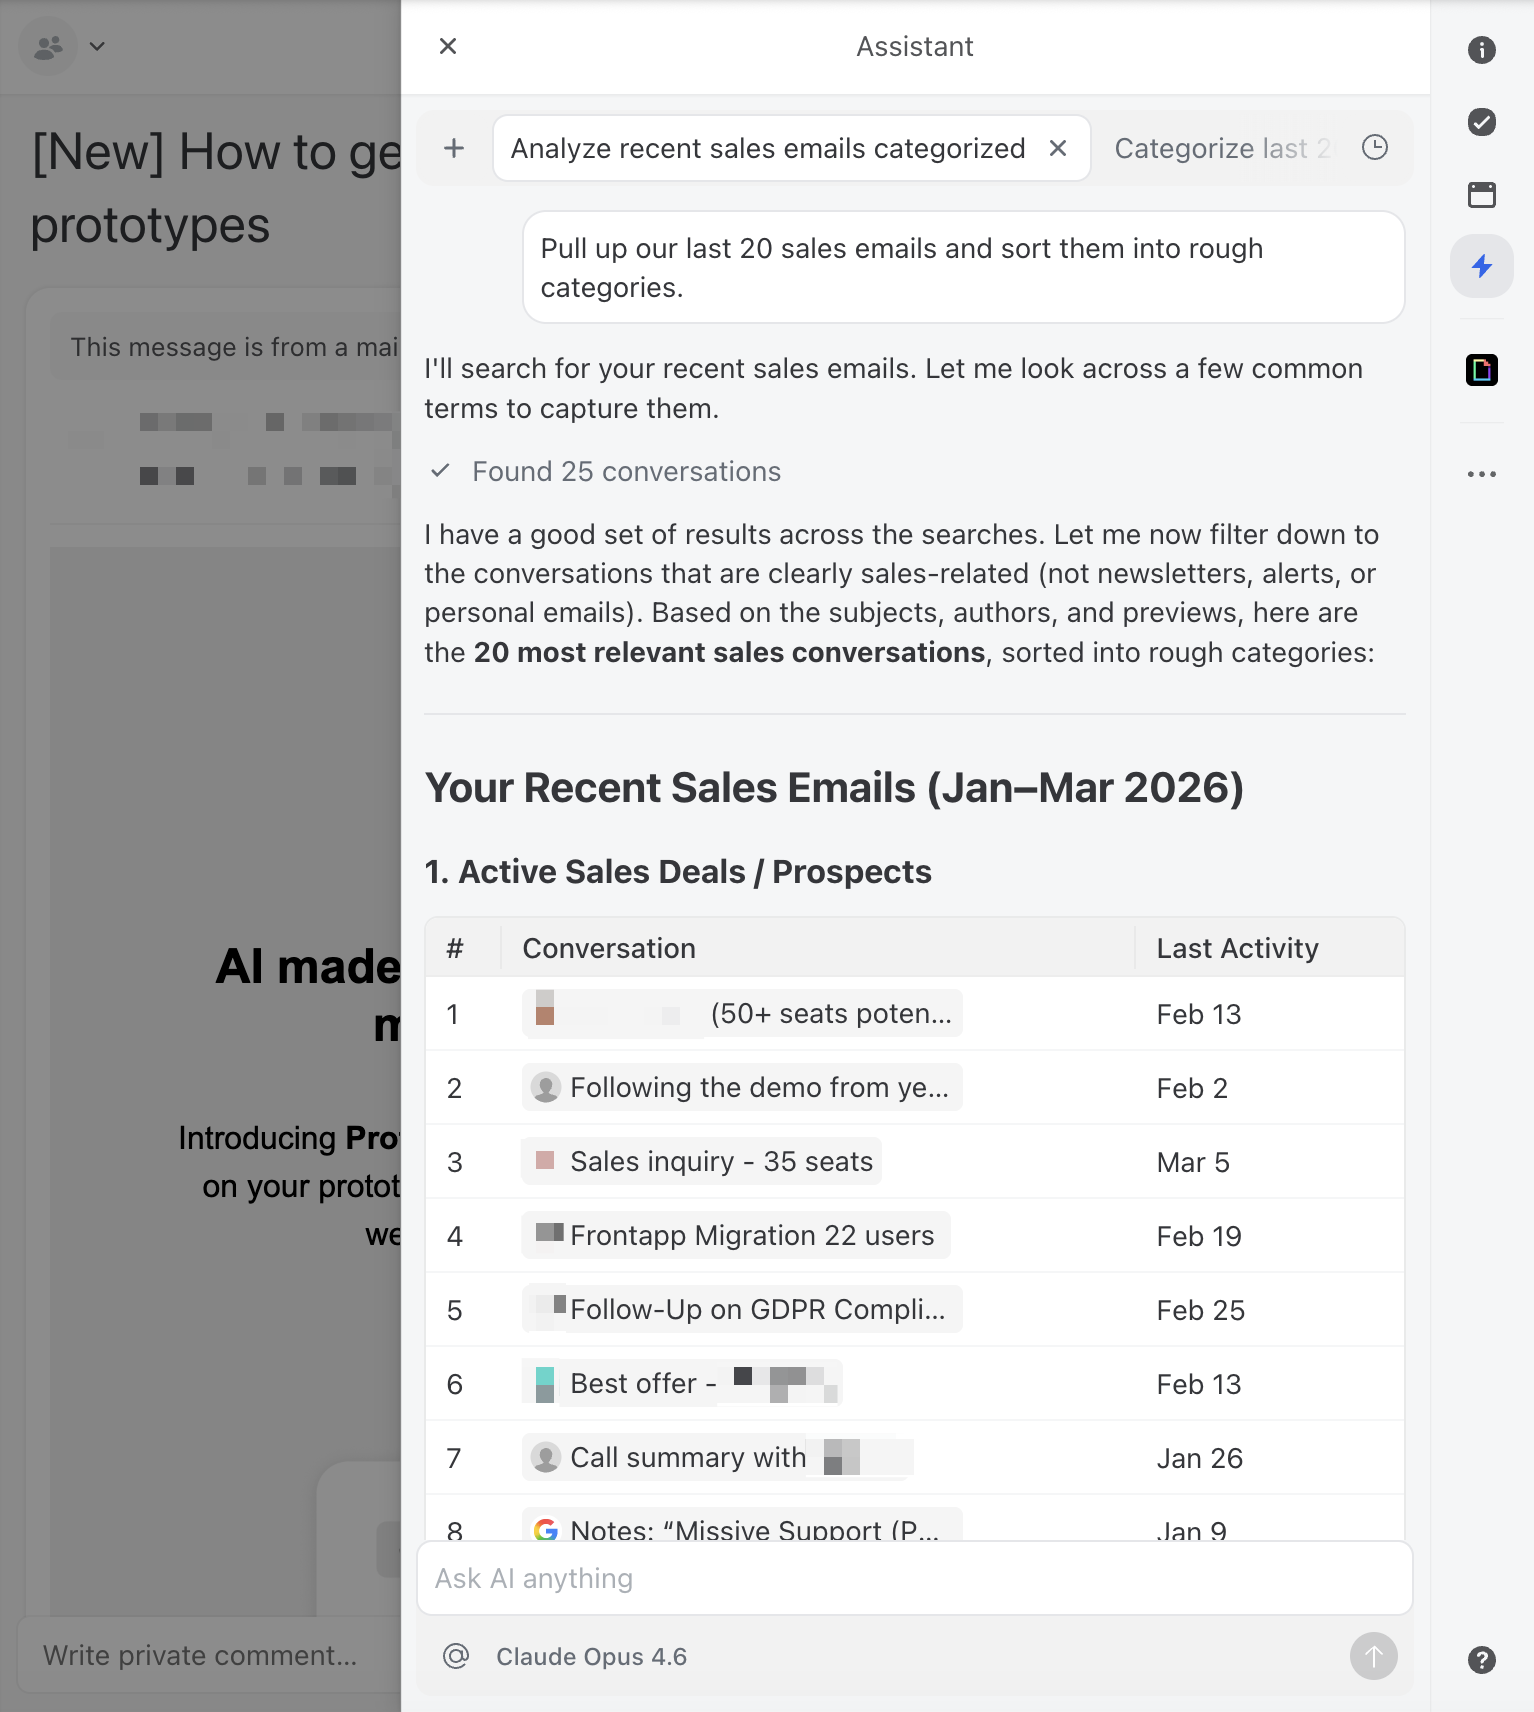
Pull up your last 50–100 customer emails and sort them into rough categories. You’ll likely find clusters like:
The first five categories are strong candidates for AI-assisted drafting. The last one, complaints and escalations, generally needs a human touch, at least for the initial response. We’ll come back to what you should not automate later.
If you use a team inbox tool like Missive, you can actually ask the AI assistant to do this analysis for you. Ask it to find recent conversations and categorize the types of inquiries. It’s a good first test of Claude’s usefulness before you build anything more structured.
Teaching Claude your voice
Claude is good at writing. The problem is that it’s good at writing like Claude, helpful, slightly formal, and generic. Your customers can tell the difference between a human reply and a default AI reply, and that gap erodes trust fast.
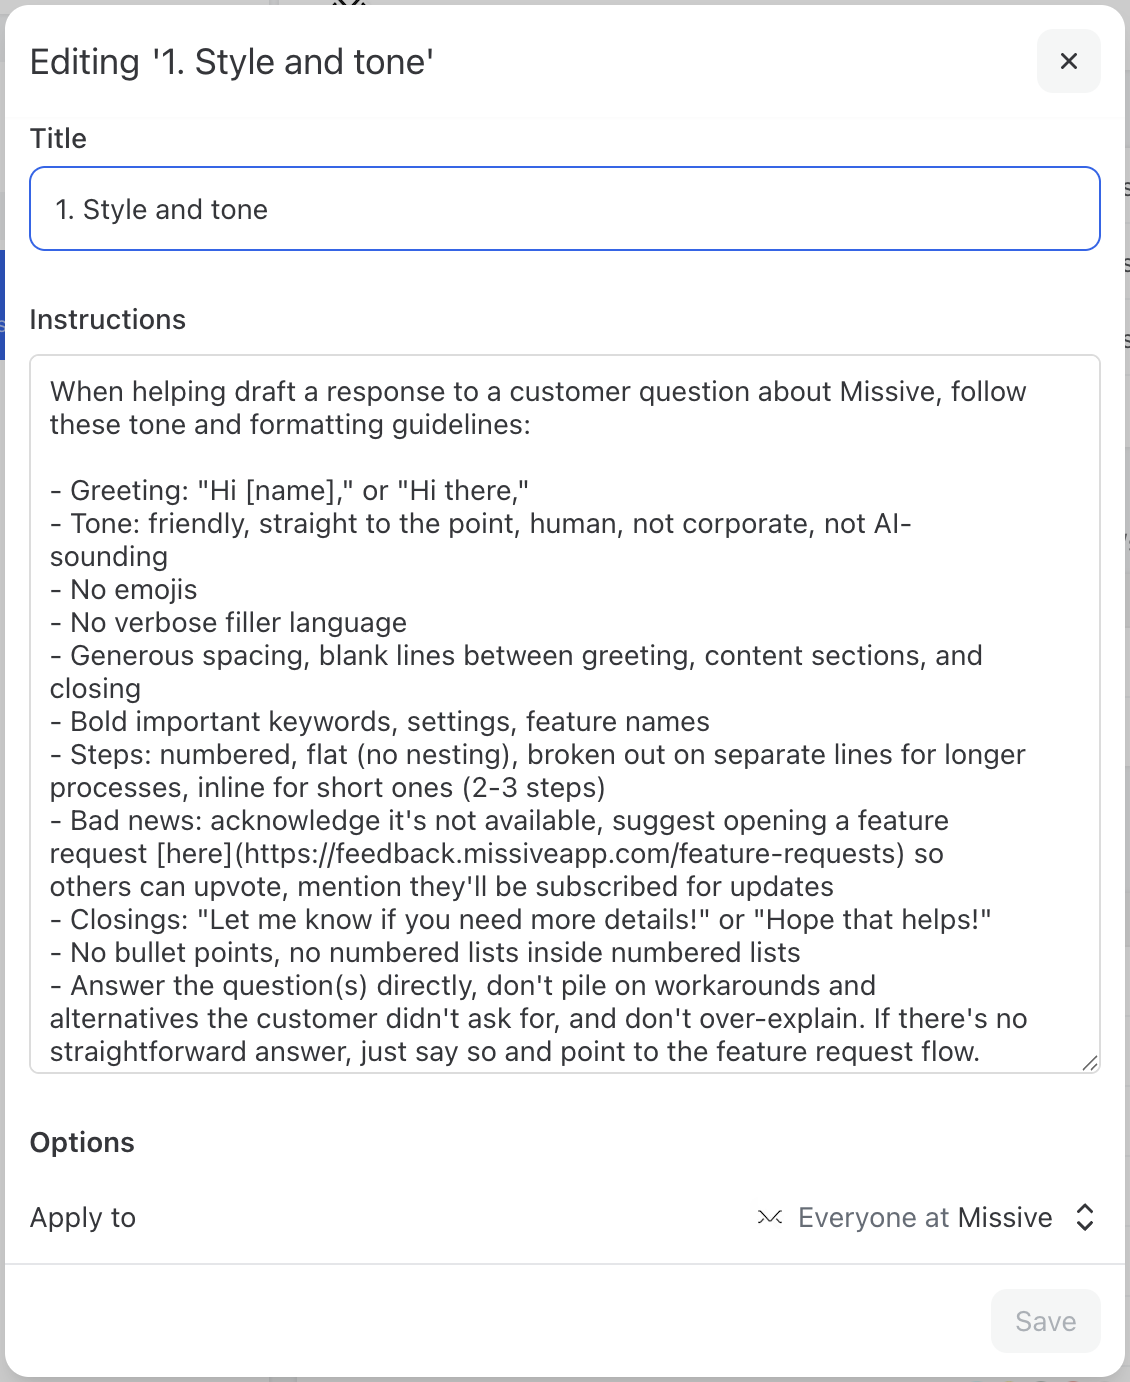
The fix is a set of written instructions that define your communication style. Think of it as a style guide specifically for AI. This doesn’t need to be long, a few clear paragraphs work better than a multi-page document.
A good style instruction covers:
Here’s a practical tip: if you’re not sure how to articulate your style, gather 10 or so of your best customer email replies—the ones where you thought “yes, that’s exactly how we should sound.”
Paste them into a session with Claude and say:
Here are examples of customer emails that represent our ideal tone and style. Can you analyze these and create a style guide I can use as AI instructions?
Claude will pick up on patterns you might not even consciously notice, your sentence length, how you open and close emails, whether you use contractions, how you handle bad news. From there, you go back and forth to refine until it feels right.
In tools like Missive, you can scope AI instructions to specific team inboxes, so your support team gets one set of drafting guidelines and your sales team gets another. This means the AI adapts its voice depending on which inbox the conversation lives in, without anyone having to think about it.
Building prompts that actually work
With your style guide in place, the next step is creating prompt templates for your most common inquiry types. A good prompt has three components: context about your business, the specific task, and constraints on the output.
Here’s a general template you can adapt:
You are a customer support specialist at [Company Name]. We [one sentence about what you do]. The customer has written to us with a question. Draft a reply that: - Directly answers their question using the information below - Matches our company tone (warm, professional, concise) - Includes a specific next step for the customer - Keeps the response under [X] sentences. Relevant information: [Paste your FAQ answer, policy details, or product information here]. If the customer’s question is ambiguous or you’re not confident in the answer, say so clearly rather than guessing. Flag it for human review.
Notice the last line. This is important. Claude is generally good about not fabricating information when explicitly told not to, and that instruction acts as a safety net. You want the AI to surface uncertainty rather than confidently give a wrong answer.
For recurring question types, create dedicated prompts. Here are two examples:
Prompt: Pricing inquiry
A customer is asking about our pricing. Draft a reply using these details: [Your pricing tiers, what’s included, any current promotions]. Be specific about what each tier includes. If they haven’t told us which tier they’re interested in, ask a clarifying question. Don’t volunteer discounts unless they specifically ask.
Prompt: Shipping and delivery
A customer is asking about shipping. Draft a reply using these details: [Your shipping options, typical delivery times by region, tracking process]. If they’ve provided an order number, reference it. If they haven’t, ask for it so we can look up the specific status. Be honest about timelines—don’t promise faster delivery than our standard windows.
Store these prompts somewhere your whole team can access them. Some team inbox tools let you save prompts as reusable one-click actions, this is ideal because it removes the friction of finding and pasting the right prompt every time.
The workflow: how this looks day to day
The goal isn’t to remove humans from the loop. It’s to change the human’s job from writing replies to reviewing them. Here’s what a good AI-assisted email workflow looks like:
Customer emails in. The message lands in your shared inbox.
Team member triggers AI draft. They select the appropriate prompt (or type a specific instruction) and Claude generates a draft reply with full conversation context.
Review and edit. The team member reads the draft, adjusts anything that's off, adds personal touches, and corrects any inaccuracies.
Send. The response goes out, faster than writing from scratch, more consistent than everyone freestyling.
Team learns. When a draft needs significant edits, that's a signal to improve the prompt or add information to your instructions.
The review step is non-negotiable, especially early on. Even a well-prompted Claude will occasionally miss context, use slightly wrong terminology, or misjudge the situation. The review step catches these issues before they reach your customer.
This is actually why Missive’s AI assistant only drafts emails, it never sends them automatically. That’s a deliberate design choice, not a limitation. AI is good, but it’s not perfect. It can hallucinate details, misread tone, or confidently answer a question with outdated information. By keeping a human between the AI draft and the send button, you get the speed benefits of AI without the risk of a bad reply landing in a customer’s inbox. Some tools let AI fire off emails unsupervised. We think that’s a mistake, at least for now.
In a team setting, this is where collaborative tools earn their keep. If you’re working in a shared inbox, a teammate can comment on a draft internally “actually, this customer already reached out about this last week, add a note acknowledging that”, before anyone hits send. The AI draft becomes a starting point for collaboration, not a black box.
What this looks like in Missive
To make this less abstract, here’s how this workflow plays out in practice using Missive’s AI assistant with Claude.
Say a customer emails your shared inbox asking whether your product integrates with their project management tool, and whether that’s included in their current plan. It’s the kind of question your team gets several times a week—not complex, but it requires pulling together information from a couple of different places.
In Missive, a team member opens the conversation and launches the AI assistant in the sidebar. The assistant already has the full conversation context, not just the latest email, but any previous messages in the thread and any internal chat your team has had about this customer. It can also look up contact details to add context about who you’re emailing.
The team member selects a saved prompt like “answer product question” and the assistant drafts a reply. Because you’ve set up team-wide style instructions, the draft automatically matches your tone. Because you’ve built a prompt that includes your integration details and plan breakdowns, the response is specific and accurate.
The team member scans it, tweaks one line, and sends, total time maybe 30 seconds instead of five minutes of digging through docs.
Now here’s where it gets more interesting. Missive is rolling out support for MCP (Model Context Protocol), which means the AI assistant will be able to connect directly to your external knowledge sources—your Google Docs, product database, CRM, help center, or any other tool that supports MCP. Instead of pasting product details into your prompts manually, the assistant will pull that information on its own when it needs it.
For the integration question above, that means the AI wouldn’t just rely on what you’ve written in the prompt template or even what's in your inbox. It could check your documentation, cross-reference the customer’s plan in your CRM, and draft a response that’s accurate to what’s true right now, not what was true when you last updated the prompt.
The human still reviews and sends, but the draft requires less editing because the context is richer.
This is the trajectory: start with saved prompts, style instructions, and inbox context today, and as MCP rolls out, progressively connect more of your tools to have a meaningfully helpful AI agent.
Connecting Claude to your knowledge
The prompts above work when you paste relevant information directly into them. But the real unlock is when Claude can access your knowledge base automatically—your FAQ documents, product guides, policy pages, and past conversations.
There are a few ways to approach this, depending on your technical setup:
Manual context: Copy and paste relevant docs into your prompt or AI sidebar. Low effort, surprisingly effective for small teams. Thisis where most teams should start.
Connected documents: Some tools let you link Google Docs, PDFs, or other files so the AI can reference them when drafting. This isthe sweet spot for teams that have their knowledge organized butdon't want to build custom integrations.
API and MCP integrations: For teams with developers on staff, the Model Context Protocol (MCP) allows Claude to pull from externaldata sources — your CRM, helpdesk, internal wiki, or even a vectordatabase like Pinecone — in real time. This is the path toward the"90–95% accurate AI rep" that requires minimal human editing.
Start with manual context. Get comfortable with the quality of Claude’s output. Then move toward connected docs or MCP as your volume and confidence grow. The mistake is over engineering the integration before you’ve validated that the prompts and instructions produce good results.
Where to keep a human in the loop
Not every customer email should get the same level of AI autonomy. For routine inquiries, a quick scan of the draft before hitting send is usually enough. But some situations deserve more careful human review, and knowing where to draw that line is what separates teams that use AI well from teams that damage customer relationships with it.
Give these extra attention before sending:
Angry or escalated customers. AI can still draft a starting point here, but a frustrated customer can tell when they're getting a generic response. Have someone read the draft carefully, add genuine empathy, and adjust the tone before it goes out. That said, AI can also playa role in routing, tools like Missive let you set up AI rules that detect frustrated or escalated language and automatically assign the conversation to a manager or senior team member, so nothing slips through the cracks.
Complex or ambiguous situations. If the email requires judgment—interpreting a contract, making an exception to policy, handling a sensitive personal situation—AI can help you organize your thoughts or pull together relevant context, but a human should write or heavily edit the final response.
High-value relationships. Your biggest clients or most important partners deserve extra care. AI can help you research and prepare a draft, but give it a thorough personal edit before sending.
Anything involving legal, medical, or financial advice. Claude is not qualified to give professional advice, and neither is anAI-generated email that sounds like it is.
A practical rule of thumb: if you’d hesitate to send the email without reading it twice, that’s a sign the AI draft needs more than a quick glance before it goes out.
Getting your team on board
Rolling out AI-assisted email to a team is as much a people challenge as a technical one. Here’s what works:
Start with one person. Pick the team member who's most comfortable with AI (or most overwhelmed by email volume) and have them pilot the workflow for a week. Collect their feedback beforerolling out to everyone.
Show, don't mandate. Demo a real example: "here's an email that took me 8 minutes to write, and here's Claude drafting a comparableresponse in 15 seconds." Time savings are visceral.
Make the prompts accessible. If people have to remember prompt syntax or go find a document, they won't use it. One-click promptsin a shared library eliminate friction.
Create a feedback loop. When someone edits an AI draft significantly, capture what they changed and why. Use that to improve your prompts and instructions. This is how the system gets better over time.
Measuring whether it’s working
Don’t just assume AI is helping, measure it. The metrics that matter:
Response time: Are you replying faster? This is usually the first and most dramatic improvement.
Draft acceptance rate: What percentage of AI drafts get sent with minimal edits? If you're rewriting most drafts, your prompts orinstructions need work.
Customer satisfaction: Are your CSAT scores or reply quality holding steady (or improving)? AI should raise the floor of response quality, not lower the ceiling.
Volume handled per person: Can each team member handle more conversations per day without burning out?
Check these monthly. The first week will be rocky as you refine prompts and learn what Claude handles well. By week three or four, you should see a clear pattern of which inquiry types Claude nails and which still need heavy human involvement.
Most teams see the biggest gains in response time—cutting average reply time from hours to minutes on routine inquiries. Draft acceptance rate is the metric to watch over time: if 70–80% of AI drafts are going out with only minor tweaks, your prompts and instructions are in good shape.
Frequently asked questions
Can Claude send emails automatically, or only draft them?
In most setups, Claude drafts responses that a human reviews before sending. Fully automated sending is technically possible through API integrations, but we’d strongly recommend against it for customer-facing email, at least until you’ve validated accuracy over hundreds of drafts and have solid error handling in place.
Which Claude model should I use for customer emails?
It depends on the task. Claude offers three model tiers, and each has a sweet spot:
Claude Haiku: fastest/cheapest, good for categorization, translation, quick replies
Claude Sonnet: best all-around for daily email drafting, balances speed/cost/quality
Claude Opus: most capable, best for complex multi-part replies and sensitive comms
How do I teach Claude my company’s tone of voice?
Write a style instruction document (see the “Teaching Claude your voice” section above). The key is being specific about what you don’t want as much as what you do. “Don’t use exclamation points” is more useful than “be professional.” Feed this into your AI tool’s instruction settings so it applies to every interaction.
Is it safe to use Claude for emails containing customer data?
This depends on your AI provider setup. When you connect Claude through an API key, requests go through Anthropic’s infrastructure. Review Anthropic’s data retention and privacy policies, they offer options for zero data retention on API calls. If you’re in a regulated industry, check with your compliance team before sending customer PII through any AI service.
What types of customer emails should I NOT use Claude for?
Escalations, complaints, legal or compliance-sensitive matters, and high-value relationship management. As a rule: if the email requires judgment, empathy, or carries significant risk if handled poorly, keep it human. Use AI for the predictable, repeatable inquiries that eat up your team’s time.
How to create rules in Outlook across every version (new, classic, Mac, web), plus what Outlook rules can’t do and when to use team alternatives.
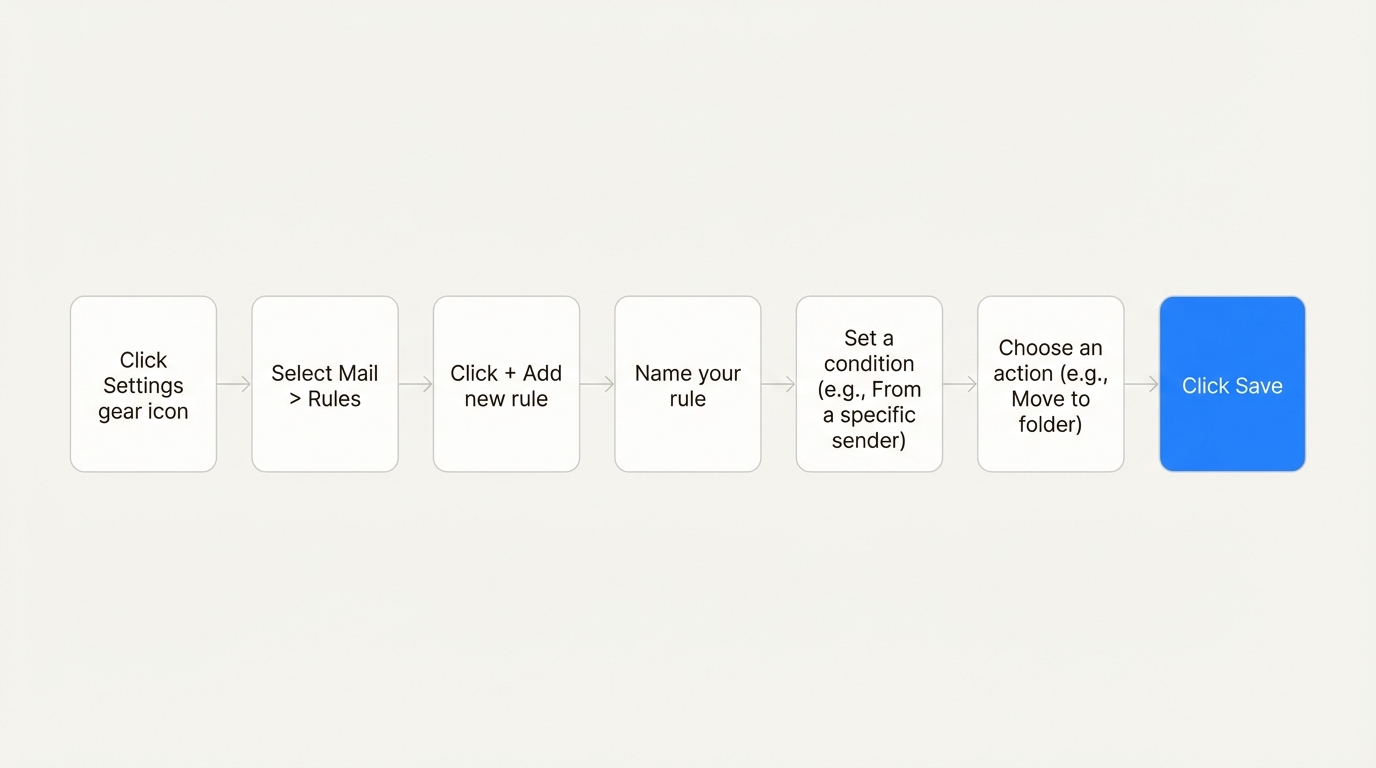
To create a rule in Outlook, open Settings → Mail → Rules (or File → Manage Rules & Alerts in classic Outlook), click Add new rule, set a condition like “From [sender]” or “Subject includes [keyword],” then pick an action like “Move to folder” or “Delete.” Save, and Outlook will run the rule on every new message that matches.
Outlook rules are the built-in way to automate what happens to incoming email. They can file messages into folders, flag important senders, delete newsletters, or trigger alerts. But the exact setup is different in each version (new Outlook for Windows, classic desktop, web, and Mac), and there are a few limitations worth knowing before you invest time building them.
This guide walks through the steps for every version, what rules can and can’t do, and when a different tool is a better fit.
Understanding the basics of Outlook rules
Think of Outlook rules as a set of “if this, then that” instructions for your email. You tell Outlook what to look for in a message, and it automatically does something specific.
The goal is simple: save time, cut down on the mental energy a cluttered inbox drains, and make sure you never miss an important message.
Not all Outlook rules are the same, though. There’s a meaningful difference between server-side and client-side rules, and it can affect whether your automation runs when you’re away from your computer.
Server-side rules: These run directly on the email server (like Microsoft Exchange). They work 24/7, even if your Outlook app is closed. They’re good for filing messages into folders or auto-forwarding. The new Outlook for Mac only supports server rules, which keeps things simple but cuts some options.
Client-side rules: These only run when the classic Outlook application is open on your computer. They handle actions that need your local app, like playing a sound or showing a desktop alert. If Outlook is closed, your client-side rules are on pause too.
Rules are processed in the order they appear in your list, which can cause weird conflicts. A rule that moves emails from your boss to a “VIP” folder might fight with a rule that moves anything with the word “report” to a “Reports” folder. What happens when your boss emails you a report? To prevent that, Outlook has a “Stop processing more rules” option to make sure only the first matching rule fires.
One last thing: storage. Exchange Online limits the total space for all your rules to just 256 KB per mailbox. Once you hit that ceiling, you can’t create or update any more rules. It sounds like a technical detail, but for power users with dozens of workflows, it’s a surprisingly low limit.
How to create rules in Outlook (for every version)
The exact steps depend on which version of Outlook you’re using.
New Outlook for Windows and Outlook.com
The new desktop app and the web version work the same way.
Click the Settings gear icon in the top right corner, then go to Mail > Rules.
Click + Add new rule.
Give your rule a name that makes sense to you.
Add a condition. This is the “if” part, like “From” a specific sender or “Subject includes” certain words.
Add an action. This is the “then” part, like “Move to” a folder or “Delete.”
If you have multiple rules, check the “Stop processing more rules” box to keep them from clashing.
Click Save.
One important limitation: the new Outlook does not support rules for third-party accounts you’ve connected, like Gmail or iCloud. For those, you’ll have to set up sorting rules directly with that email provider.
Classic Outlook for Windows
The classic desktop version has the most detailed options, accessible through its Rules Wizard. It’s also where you’ll have to think about the client-side vs. server-side distinction.
There are two main ways to start:
From a message: The fastest method. Right-click an email that’s a good example of what you want to automate, then select Rules > Create Rule. Outlook will pre-fill some of the conditions for you, like the sender’s name. This is what you want if you’re wondering how to create a rule from a selected email.
From a template: For more control, go to File > Manage Rules & Alerts > New Rule. This opens the Rules Wizard, which gives you templates for common tasks like “Move messages from someone to a folder.”
The Rules Wizard walks you through a few steps: choose a template, set your conditions (the “if”), pick your actions (the “then”), add any exceptions, name the rule, and turn it on.
A useful feature here is the “Run this rule now on messages already in the current folder” option. It’s good for cleaning up an existing folder right after you create a rule.
Outlook for Mac recently simplified its approach. To make rules more reliable, it now only supports server-side rules. Your automation will always work, even when the app is closed. The trade-off is that client-side actions like custom sounds are no longer available.
Here’s how to set one up:
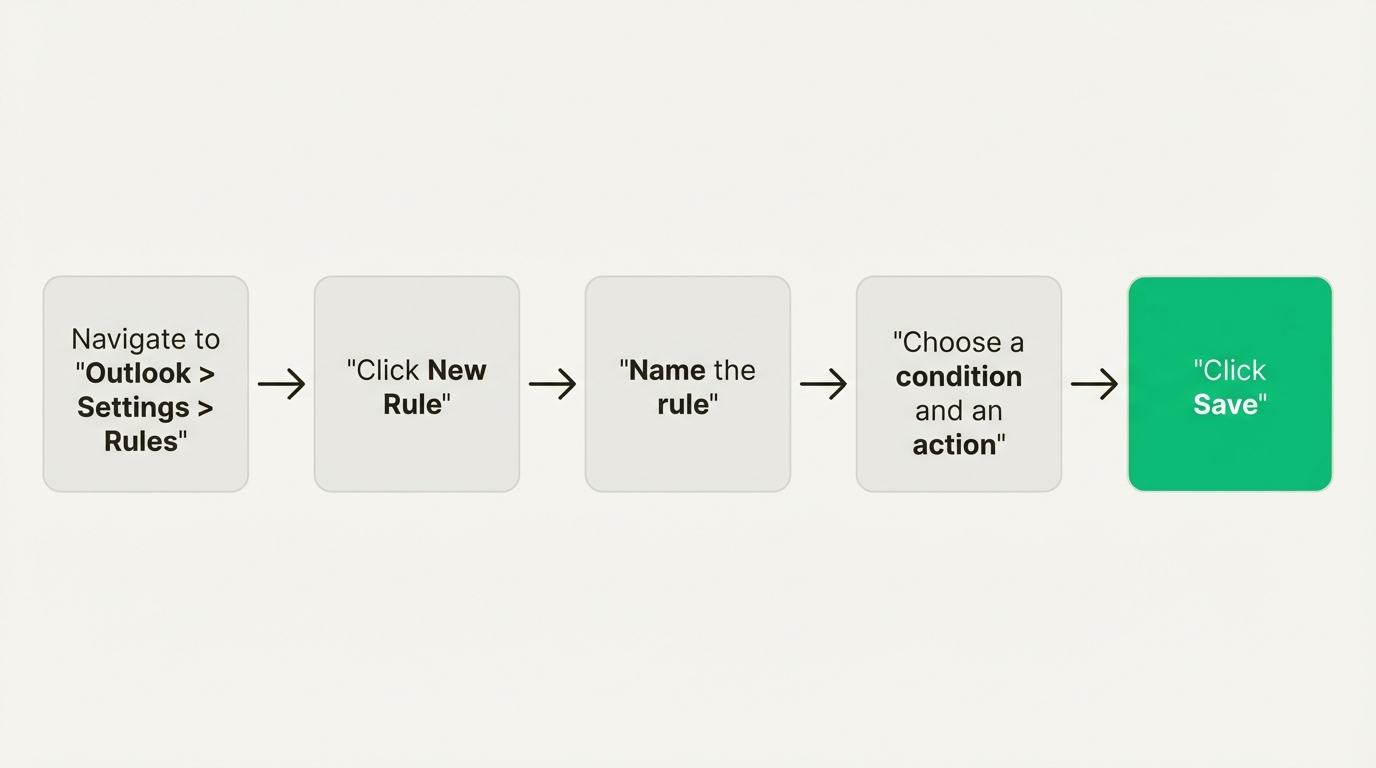
From the top menu bar, go to Outlook > Settings > Rules.
Click New Rule and give it a name.
Choose a condition (like “From”) and an action (like “Move to Folder”).
Use the “Stop processing more rules” option if you need to avoid conflicts.
Click Save.
Features and limitations of Outlook rules
Now that you know how to build rules, here’s where they shine and where they fall short, especially for teams.
Core capabilities
For managing your own personal inbox, Outlook rules are capable. They’re particularly good at a few things:
Sorting. You can automatically move messages based on the sender, keywords in the subject line, or whether you’re in the To or CC field. This is the quickest way to keep your main inbox focused on what needs your attention right now.
Prioritization. Set up a rule to flag any message from your manager or with the word “urgent” in the subject. Important messages float to the top; nothing gets missed.
Inbox cleaning. Tired of promotional emails and newsletters cluttering up your inbox? A rule can send them to a “Read Later” folder or delete them on arrival.
Custom alerts. In classic Outlook, you can set up desktop alerts or sounds for high-priority emails, so you get an immediate heads-up when something important lands.
Limitations for team collaboration
These features were designed for individual use. In a team setting, the limits show up fast.
They aren’t collaborative. Rules are tied to a single user’s account. You can’t create a rule to automatically assign a new customer question to the next available person on your support team. You can’t balance the workload for a shared inbox like sales@company.com. That work stays manual, which means duplicate replies or missed emails.
They’re email-only. Business communication isn’t just email anymore. Your team is probably juggling messages from SMS, WhatsApp, website live chat, and social media. Outlook rules only work on email, so other channels get managed in separate tools. Conversations get split; customer messages slip through.
They can be device-dependent. The client-side rule limitation is a problem for teams that need constant availability. A rule you built to notify you about an urgent lead won’t run after hours if your work computer is off. Real automation needs to be on all the time, not just when you’re at your desk.
Rule management gets messy. As your list of rules grows, they start to conflict or break. The bigger issue is the 256 KB storage cap. Power users hit the ceiling and are suddenly unable to create any more rules. People work around it by shortening rule names or cramming multiple conditions into one rule to save bytes.
These limits show that Outlook rules are built for individual productivity. For teams that need collaborative automation across multiple channels, a different tool is a better fit.
When to consider alternatives to Outlook rules
Outlook rules are a great starting point for taming your personal inbox. When workflows involve multiple people, though, the individual-focused model runs out of room. If your team needs shared ownership, clear accountability, and a single place for all customer conversations, a more capable rule system is worth looking at.
Missive is a collaborative email client built for teams. It connects your team’s shared addresses (support@, sales@, info@) alongside personal inboxes, and it handles email, SMS, WhatsApp, Instagram, Messenger, and live chat in one place. Missive’s rules can do everything Outlook rules do and more: assign conversations in a round-robin, add internal comments for context, apply shared tags, and run automations across every channel, not just email.
Three examples of what Missive rules can do that Outlook rules can’t:
Service level agreements: set up SLAs to maintain short response times across your whole team. Specify reminders and escalate to certain users if breached.
Escalate urgent emails using AI: have AI process the context of incoming client emails. If they’re urgent, escalate and assign to a pre-selected person.
Automatic follow-ups: trigger a sequence of follow-up emails based on an email you sent. Automatically stop following up once someone replies.
Here’s a deep dive into the difference between personal rules and organization rules:
FAQ
How do you create a new rule in Outlook?
In the new Outlook for Windows or Outlook.com, go to Settings > Mail > Rules > + Add new rule. Give the rule a name, pick a condition (like “From [sender]”), pick an action (like “Move to [folder]”), and save. In classic Outlook, go to File > Manage Rules & Alerts > New Rule to open the Rules Wizard. In Outlook for Mac, go to Outlook > Settings > Rules > New Rule.
How do I make certain emails go directly into a folder in Outlook?
Create a rule with a condition that matches the emails you want to sort (for example, “From: newsletter@example.com” or “Subject contains: Invoice”), then set the action to “Move to” and pick the folder. Check “Stop processing more rules” if you have other rules that might conflict. New messages matching the condition will land in the folder instead of your main inbox, and you can also run the rule on existing messages in classic Outlook via the “Run rules now” option.
How do you create a rule based on a selected email?
In classic Outlook for Windows, right-click the email and select Rules > Create Rule. Outlook pre-fills the conditions based on the selected message (sender, subject line, recipients), so you can confirm or tweak the details rather than building the rule from scratch. In the new Outlook and on Mac, the right-click option is more limited; you’ll usually need to open the full rule editor and enter conditions manually.
Can I set up Outlook rules to forward emails automatically?
Yes, but with caveats. You can create a rule with the action “Forward it to [email address]” to automatically forward matching messages. However, many organizations disable external auto-forwarding by default as a security measure against phishing and data exfiltration. If your rule silently stops working, check with your IT admin first.
Why aren’t my Outlook rules running?
The three most common reasons: (1) the rule is client-side and Outlook is closed, so it won’t fire until you open the app; (2) you’ve hit the 256 KB rules storage limit, and new rules are being silently ignored; (3) rules earlier in the list with “Stop processing more rules” are intercepting the message first. Microsoft has a broken rule troubleshooter for the first issue, and you can free up space by deleting unused rules or consolidating them.
Do Outlook rules work on mobile?
Rules created on desktop or web will run on any device as long as they’re server-side. You can’t create or edit rules from the Outlook mobile app directly; you’d need to open the web version in a mobile browser to make changes.
What’s the difference between Outlook rules and Missive rules?
Outlook rules are per-user and email-only. Missive rules are team-level and cross-channel. A Missive rule can assign an incoming conversation to a specific teammate, apply tags visible to everyone, add internal chat messages for context, and run across email, SMS, WhatsApp, Instagram, and live chat. Outlook rules can’t assign, can’t add team notes, and don’t know about anything outside of email.
Missive is a collaborative email client built for teams that have outgrown personal rules. Connect your team’s shared addresses, automate assignments with AI-powered rules, and handle every customer channel from one place. Try Missive free.


.png)


.png)

.png)
.png)